

Project Overview
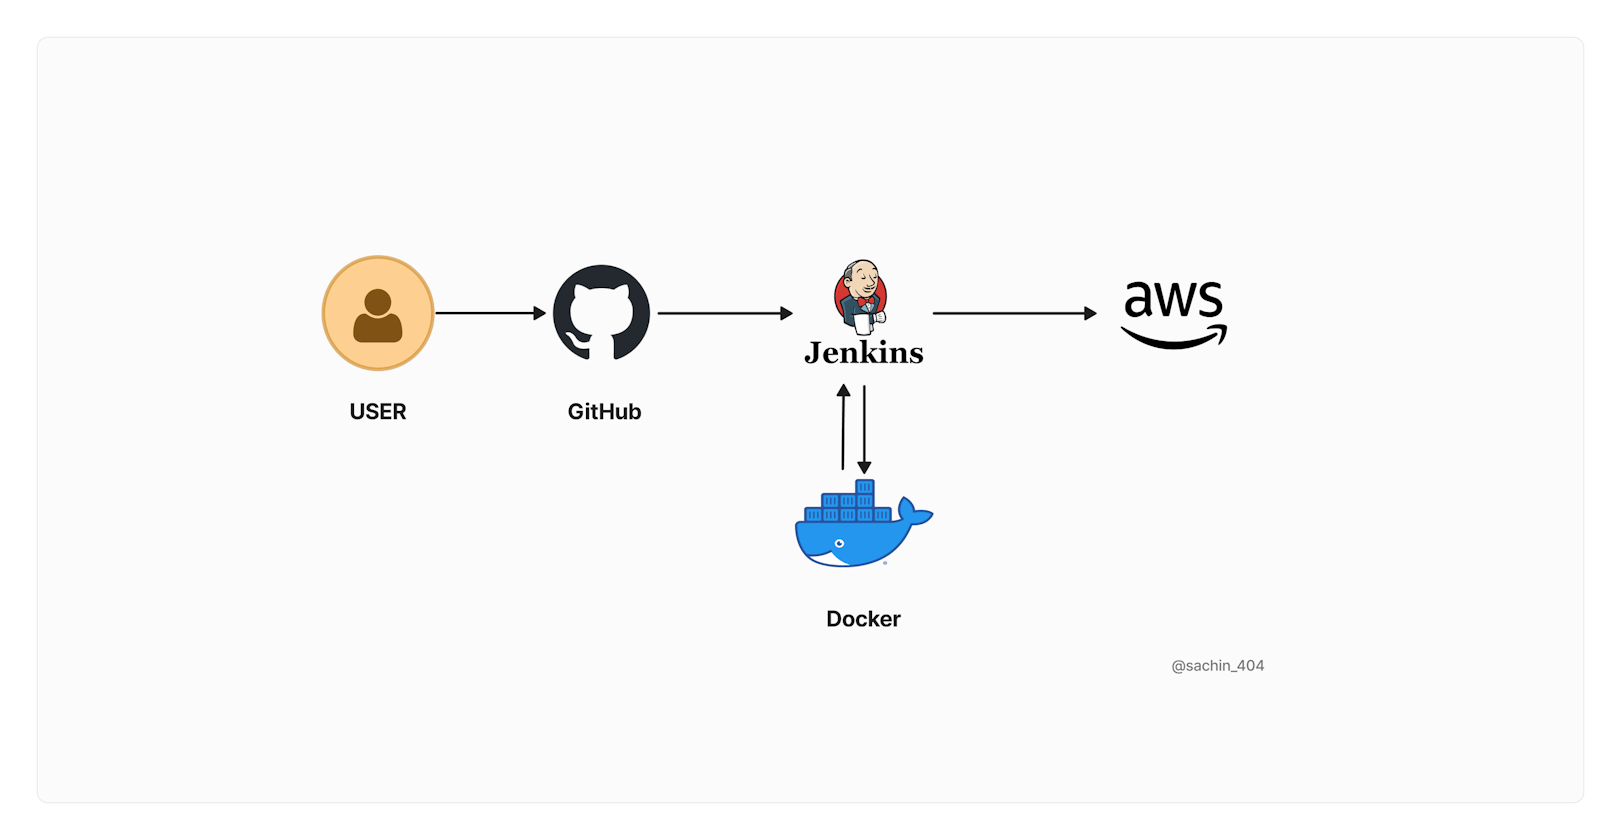
This blog provides detailed step-by-step instructions for deploying a Django application using Docker, AWS, and Jenkins.
Source Code Repository: The application's source code is hosted in this repository.
Infrastructure Setup on AWS: I orchestrated the deployment environment by creating an EC2 instance, configuring security groups, and establishing networking for seamless communication between components.
Containerization using Docker: I containerized the Django application using Docker, crafting a Dockerfile that encapsulates the application's dependencies, configurations, and runtime environment. This approach ensures consistent deployments across different environments.
CI/CD Pipeline with Jenkins: I integrated Jenkins, a robust CI/CD tool, into the workflow. Leveraging Jenkins, I automated the building, testing, and deployment processes, streamlining development cycles and ensuring consistent quality.
GitHub Integration and Webhooks: I established a seamless integration between GitHub and Jenkins by leveraging GitHub webhooks. This enabled the automatic triggering of CI/CD pipelines upon code changes or pull requests, promoting efficient collaboration and rapid feedback loops.
1. Set Up AWS EC2 Instance
The first crucial step is to set up an EC2 instance on AWS. Follow these steps:
Access the AWS Management Console and navigate to the EC2 service.
Launch a new EC2 instance, selecting the desired instance type, storage options, and other configuration settings as per your requirements.
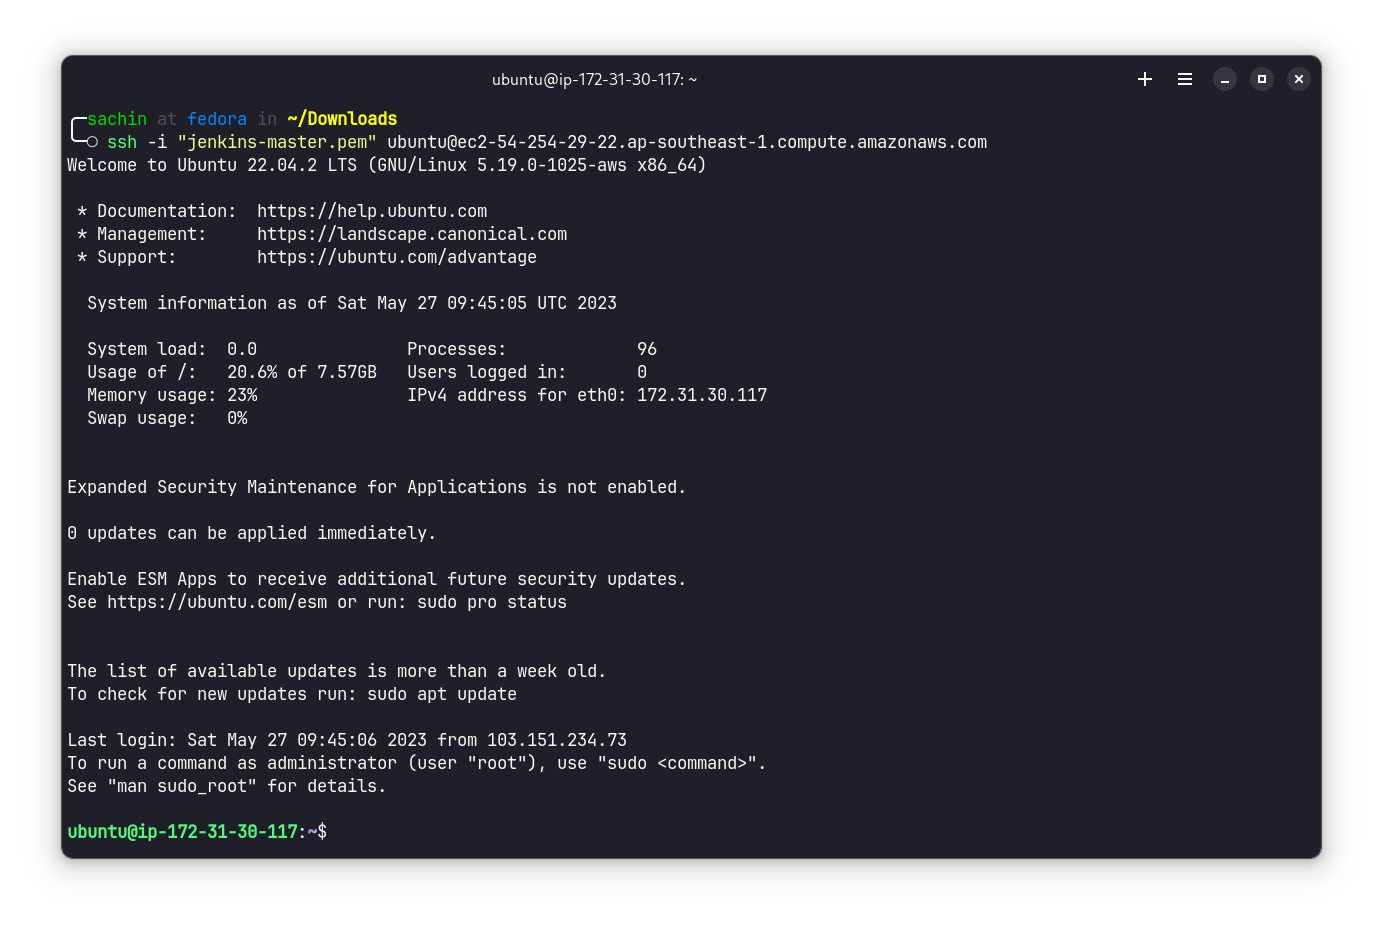
Once the instance is successfully provisioned, establish a secure SSH connection to the EC2 instance from your terminal using the appropriate SSH client.
Verify the successful connection by ensuring that you have access to the EC2 instance's command-line interface. It should look like the following output:
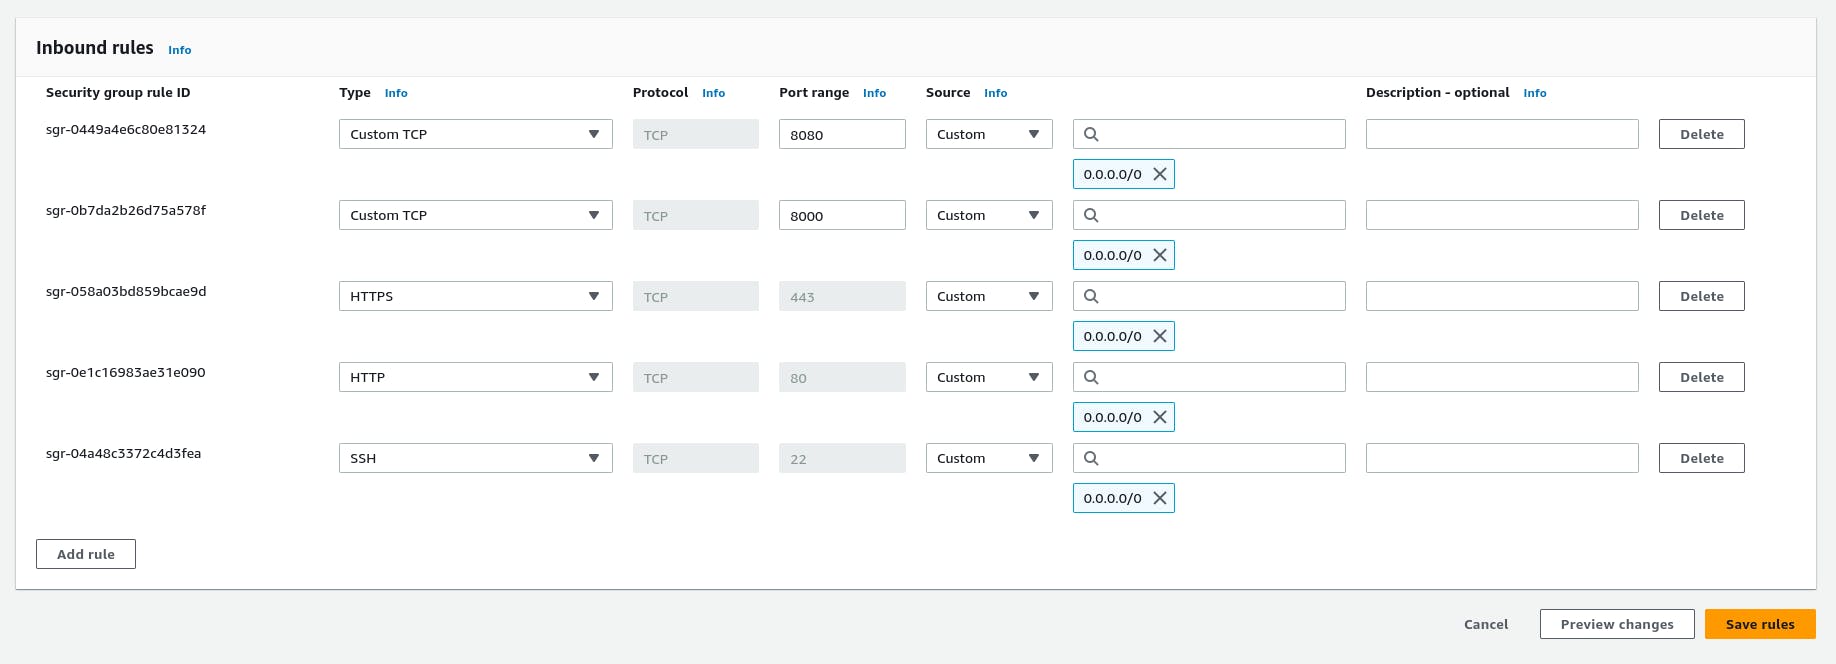
Before proceeding, it's essential to modify the inbound rules of the security group associated with the EC2 instance. This step allows the necessary ports to be accessible for Jenkins (port 8080) and the Django application (port 8000).
Example screenshot of security group inbound rules:
By following these steps, we establish the foundation for hosting the Django application and setting up the necessary network configurations on AWS.
2. Install Docker
To containerize the application and enable easy deployment, we need to install Docker on the EC2 instance. Follow these commands to install Docker and add the current user to the Docker group:
sudo apt install docker.io
sudo usermod -aG docker $USER && newgrp docker
It will install Docker on the EC2 instance and grant the necessary permissions to the current user to manage Docker containers. Docker plays a crucial role in encapsulating the application and its dependencies within a container, ensuring consistency and portability in deployments.
3. Install Jenkins
- update your system by running the following commands
sudo apt update
- install Java
sudo apt install openjdk-11-jre
- Run following commands to install Jenkins
wget -q -O - https://pkg.jenkins.io/debian-stable/jenkins.io.key |sudo gpg --dearmor -o /usr/share/keyrings/jenkins.gpg
sudo sh -c 'echo deb [signed-by=/usr/share/keyrings/jenkins.gpg] http://pkg.jenkins.io/debian-stable binary/ > /etc/apt/sources.list.d/jenkins.list'
sudo apt update
sudo apt install jenkins
- Start Jenkins
sudo systemctl start jenkins
sudo systemctl status jenkins
Run
sudo systemctl status jenkinsto check the status. If it gives output as active (running), the installation was successful.Now open your browser and enter
<instance-public-ip:8080>(in my case it is 13.229.83.163:8080) to access jenkins.It will ask for the password. Run
sudo cat /var/lib/jenkins/secrets/initialAdminPasswordto get the key.Finish the installation by installing suggested plugins and setting up the account.
4. Integrate Jenkins and GitHub
To enable Jenkins to fetch code from GitHub, it is necessary to integrate GitHub and Jenkins using SSH. This integration will enable Jenkins to access and fetch code from GitHub repository for continuous integration and deployment processes.
Follow these steps:
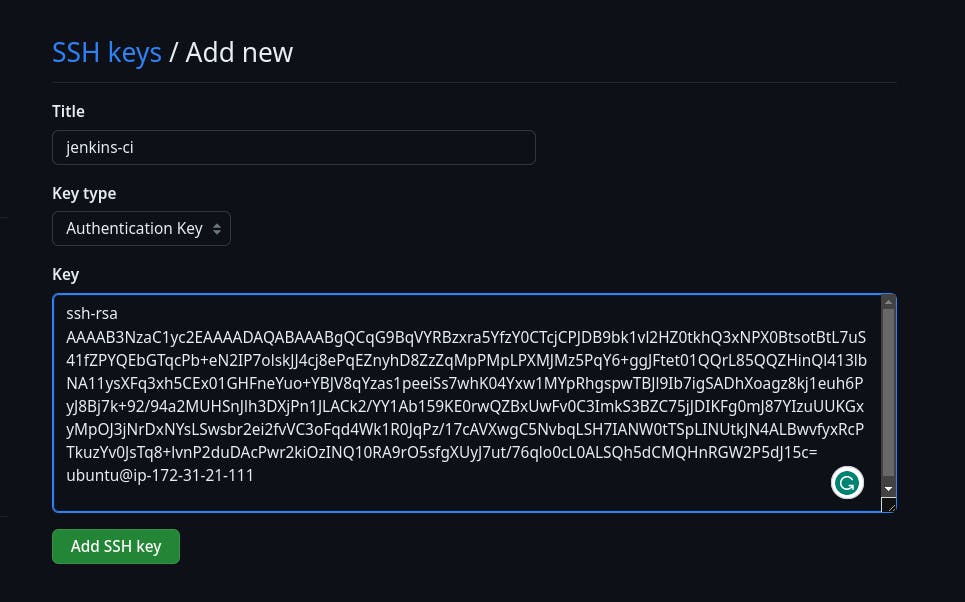
Generate SSH Keys: Run the following command to generate SSH keys:
ssh-keygenThis command will generate two keys:
id_rsa(private key) andid_rsa.pub(public key). These keys will be stored in the.sshdirectory.View the Keys: To view the contents of the generated keys, run the following commands:
 cat ~/.ssh/id_rsa
 cat ~/.ssh/id_rsa.pub
These commands will display the private and public keys respectively.
Now open github.com and go to settings -> ssh key -> add new ssh key. Enter public ssh key (id_rsa.pub) in key section.
5. Setup CICD Pipeline
To set up a CI/CD pipeline in Jenkins, follow these steps:
Access Jenkins on Port 8080:
Access Jenkins by navigating to the EC2 instance's public IP address followed by port 8080 in your web browser. For example:
http://<EC2-Instance-IP>:8080.Create a New Freestyle Project:
Inside Jenkins, create a new freestyle project by following these steps:
Click on "New Item" to create a new project.
Provide a suitable name for your project and select the "Freestyle project" option.
Click on "OK" to proceed.
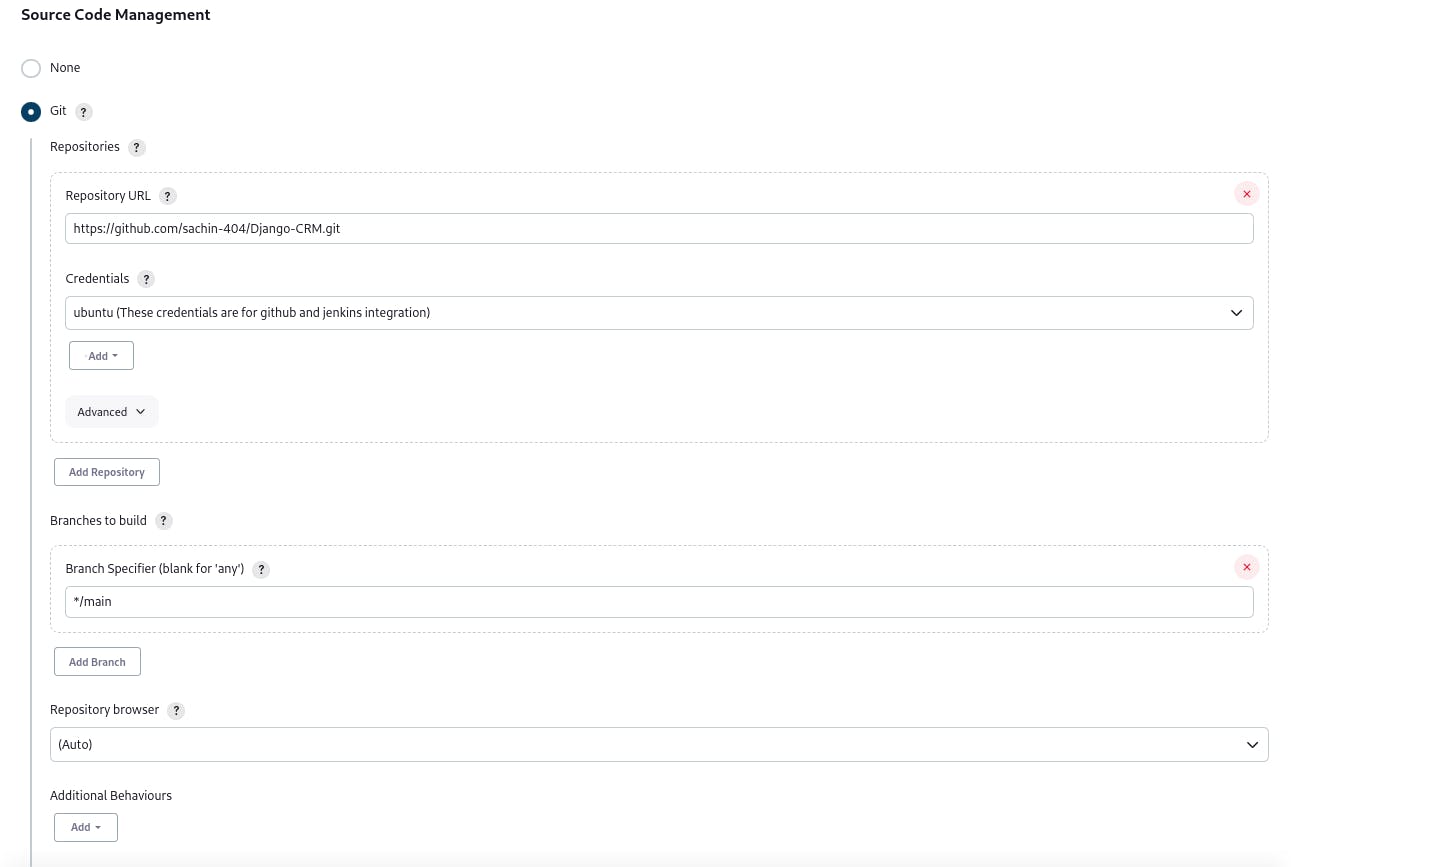
Configure Source Code Management:
In the project configuration, locate the "Source Code Management" section and select Git. Enter the URL of your repository.
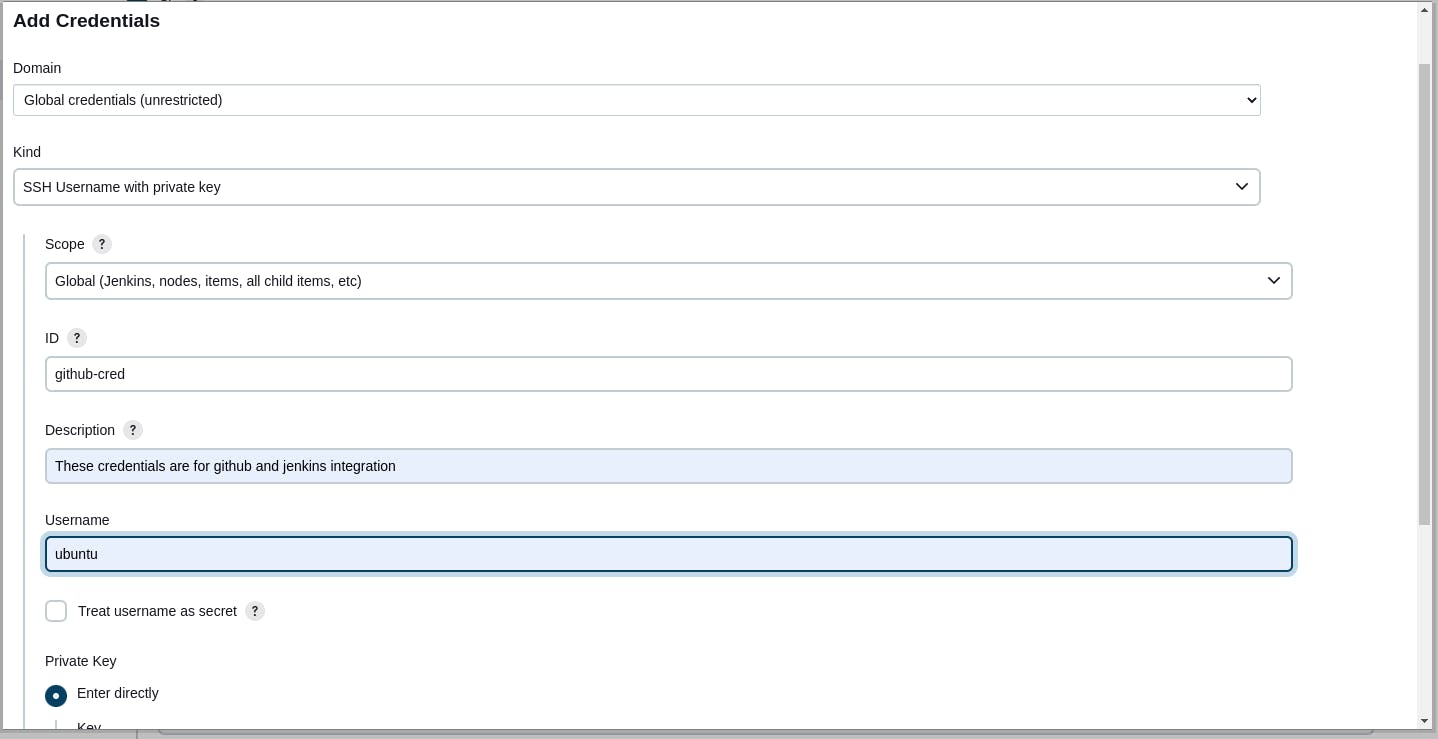
Configure Credentials:
In the "Credentials" section of the project configuration:
Click on "Add" button to create new credentials.
Fill in the required fields, providing a suitable description for the credentials.
In the "Private key" section, enter the contents of the private SSH key (
id_rsa) generated earlier.Save the credentials.
Specify the Branch to Trigger the CI/CD Build:
Specify the branch name in the "Branch Specifier" field. Enter the branch name on which you want to trigger the CI/CD build (e.g., "main").
Setup GitHub Hooks
To automate Jenkins builds using GitHub hooks and trigger builds whenever changes are committed to the GitHub repository, follow these steps:
Check "GitHub hook trigger for GITScm polling" in build trigger section:
In the Jenkins job configuration, navigate to the "Build Triggers" section and check the option "GitHub hook trigger for GITScm polling". This enables Jenkins to listen for webhook events from GitHub and automatically trigger builds.
Install the GitHub Integration Plugin:
Before proceeding, install the "GitHub Integration" plugin in Jenkins. Follow these steps:
Open Jenkins in a new tab or window.
Go to the Jenkins homepage and click on "Manage Jenkins".
Navigate to "Manage Plugins".
In the "Available" tab, search for "GitHub Integration" and install the plugin.
Configure Webhooks on GitHub:
To configure webhooks on GitHub for your repository, follow these steps:
Open your GitHub repository in a browser.
Click on the "Settings" tab.
Navigate to the "Webhooks" section and click on "Add webhook".
In the "Payload URL" section, enter your Jenkins URL followed by "/github-webhook/". For example, "13.229.83.163:8080/github-webhook".
Select "application/json" as the Content type and save the webhook.
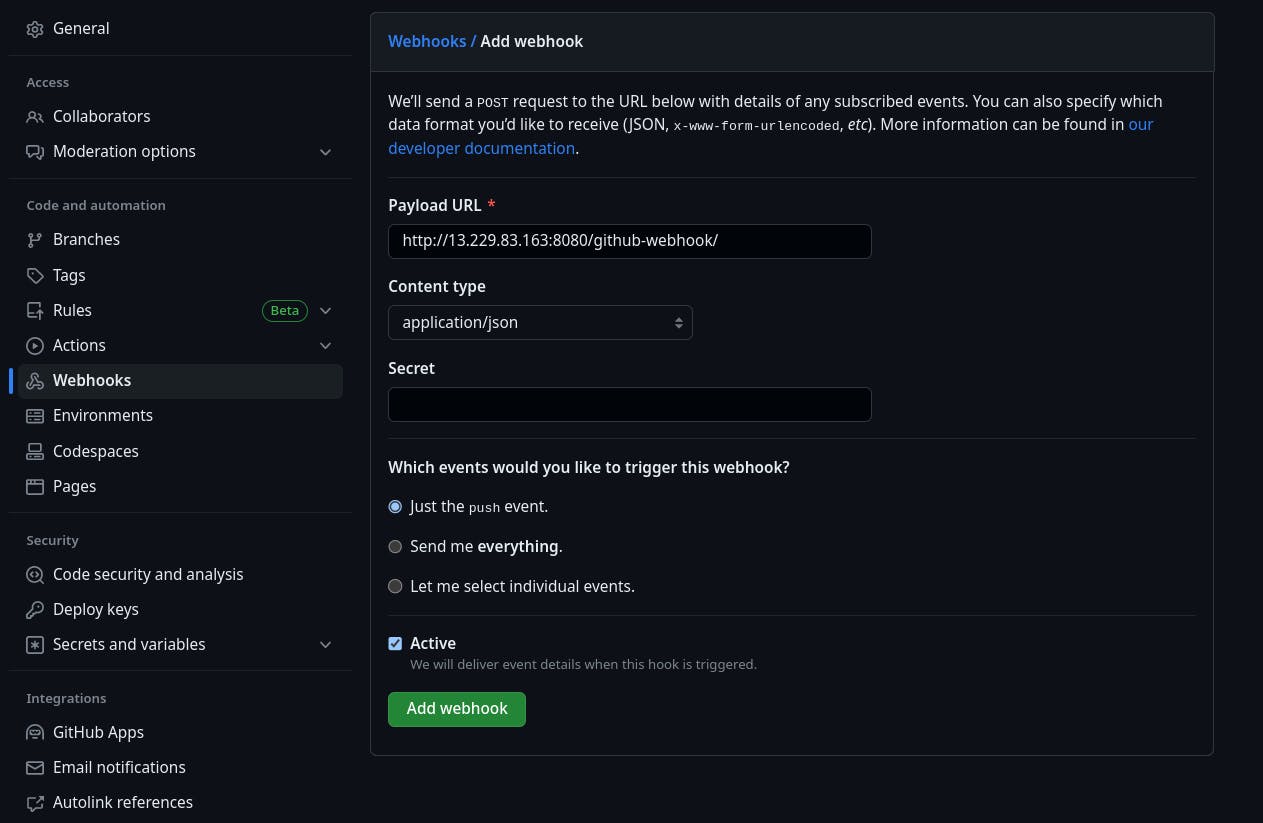
By completing these steps, we establish the integration between Jenkins and GitHub using webhooks. This allows Jenkins to receive notifications from GitHub whenever changes are made to the repository, triggering automatic builds and enabling continuous integration processes.
Add Build Steps
Build Steps:
In the project configuration, locate the "Build" or "Build Steps" section and select "Execute shell". This allows you to execute shell commands as part of the build process.
Enter Build Commands:
Enter the following commands to build and run the Docker image:
 # Build the Docker image
 docker build -t crm-app .

 # Stop and remove any existing container with the same name
 docker stop crm-app-container || true
 docker rm crm-app-container || true

 # Run the Docker container
 docker run -d -p 8000:8000 --name crm-app-container crm-app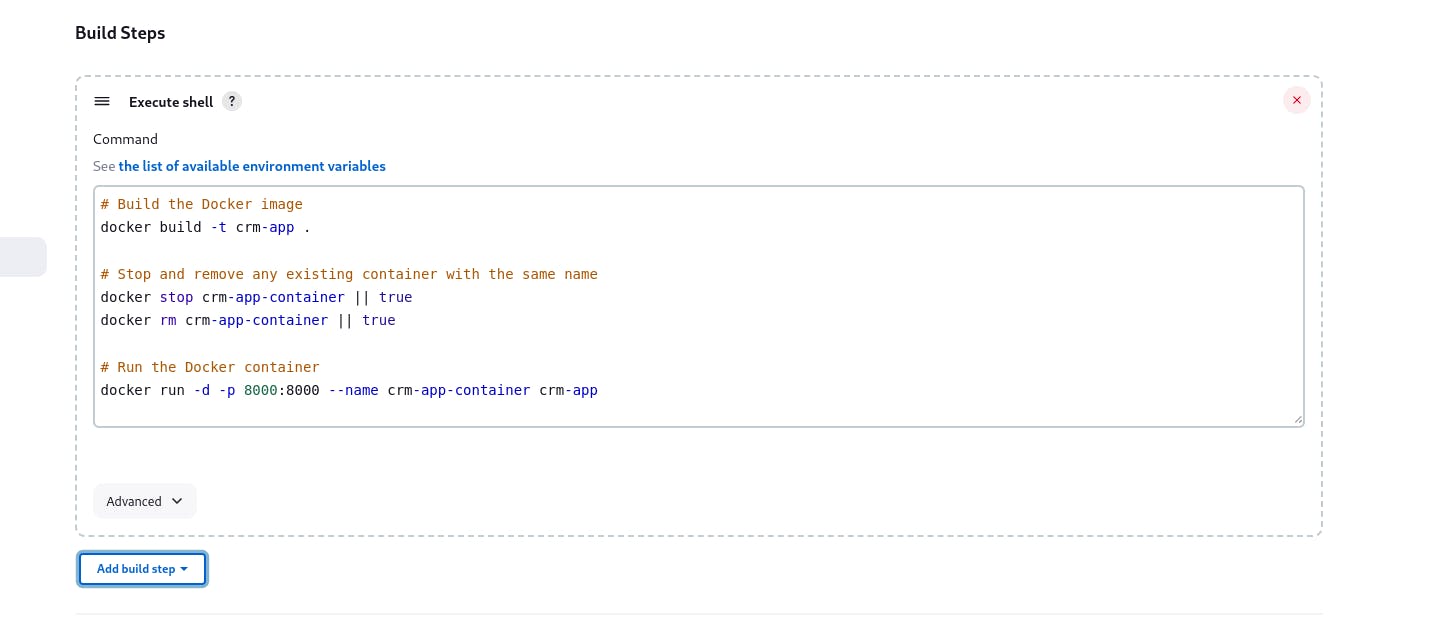
Save Configuration:
Save the project configuration to apply the build steps.
Jenkins executes the provided commands during the build process. This includes building the Docker image, stopping and removing any existing container with the same name, and running the Docker container for the Django application.
To initiate a build, click on "Build Now" in Jenkins. You can monitor the progress and view the build steps' console output to observe the execution and any potential errors or logs.
NOTE: When I ran the buid for the first time I got permission denied error. If you also encounter any similar error then follow these steps:
Run following command to add Jenkins to the user group
sudo usermod -a -G jenkinsRestart Jenkins
sudo systemctl restart jenkinsNow again open Jenkins in browser, login and start the build.
If you still encounter any error try rebooting the EC2 instance.
Wrap Up
By following these steps, you can set up an end-to-end CI/CD pipeline for your Django application, utilizing Docker for containerization, AWS for hosting the EC2 instance, and Jenkins for automating the build and deployment process.
I hope you found this blog post informative and helpful. If you have any queries or feedback, please feel free to reach out to me via Twitter DMs. I'm always open for discussion. Don't hesitate to say hi, and we can explore the topic further together.